Monday, December 12, 2011

Simple Mod Podge Frame

Do you know how difficult it is to find a 3.5 x 5 inch frame at a reasonable price?  Let alone make it a holiday one.  If you have been looking, you know what I mean; everything is 4x6 these days!  When Jacob had his Santa visit this year we ordered a picture package that had a few extra pictures - enough to share with our family.  My grandmother (Gigi for Great Grandma) recently relocated to Alabama.  After 55+ years raising her family and grand kids in the same home, this year is going to be tough.  Getting her a picture wasn't enough.  It had to be special.  After my search for a cute frame that she would like as well, I gave up and made it myself. 

Here's how...

Supplies Needed:
  • Plain black frame Michael's (It was less that $5, plus 40% off - love it!)
  • Scrapbook paper (Had some from a previous project)
  • Mod Podge and a foam brush
  • Paper trimmer and a straight blade
  • Ink pad(s) (optional)
  1. Trim your paper to the size needed for the frame. I like to trim mine just a hair smaller so that I am not trying to mod podge a fraction of paper over the edge. 
  2. Trace the area needed to be cut out for the picture, using the straight blade make your cuts.
  3. I added some ink smudges to my paper to give it a little more umph.  This is optional.
  4. Smear mod podge around the front of the frame and lay your scrapbook paper cut out on top.  Smooth it out and make sure it is placed properly.
  5. Once the first application is dry, apply mod podge to the top of the paper.

Thursday, November 3, 2011

Fall Wreath & Garland - as cheap as it gets!

Fall is such a lovely time of year to decorate.  The colors are rich and comorting like a giant hug to keep you warm as the temps start to drop.  This year I am excited that we will be in Arizona with our families for Thanksgiving and the best part is that we will be meeting Baby Benjamin for the first time.  So, I didn't want to go all out and spend tons of money on decor.  That is where Creative Karma comes in to play.  What can I do on the cheap using materials that are recycled and inexpensive. 

Tuesday was a pretty blustery day, leaves were blown off trees and are piling up along the side walks.  On a walk with Charlie and Jacob I decided to pick up a bunch of beautiful, huge leaves.  Thank you Mother Nature for your generosity and timing.  An idea was born!

Mantle Wreath:
Using a $1 store wreath I had tucked away for future use, I hot glued the leaves on to the wreath. That's it.  Seriously, that's it.  Using the $1 wreath I already had, leaves donated from the gutter and side walk, one stick of hot glue and I myself a wreath. 


Garland:
I love twine; it's just so versatile.  you never know when you might need it. Today was the day. I took my trusty hot glue gun and glued a few leaves to the twine and hung it across the mirror in my living room.  Can you say free?  Spell it with me, F-R-E-E.  Does it get better?  Yes, indeed it does.  Also in this picture is my good old vase that is now adorned with the fall florals I picked up at -where esle? The $1 store a few week back.  In addition to that, I have leftover pumpkins that were given to me by Jacob's school. 


I am no where near done, but I was pretty stoked to share what I have so far.  All for about $5 and using the gifts that Mother Nature gave us.  That being said, the wreath and the garland are fragile.  I will not be able to save them for next year.  But who cares, right?! Free supplies rule!

Sunday, October 30, 2011

3 Little Ghosts Handprint Art

I love Halloween.  I think it is because of the unleashed creativity and fun that it inspires.  You can be anything and do anything.  As a little girl dress up and make believe were one of my favorite things and I am not ashamed to admit I have never grown out of it.  Now that I have kids people don't look at me so crazy for getting so into this holiday.


This 3 Little Ghosts craft idea was inspired by a Lowe's project.  The original idea suggested a piece of wood and spray paint.  Recently I discovered that Walmart sells a 2 pack of 8"x10" canvases for around $5 - STEAL!  Needless to say, I am obsessed with what I can create with them and the idea to use them instead of a piece of wood was solid.

First, I painted the canvases with black acrylic paint.  This was fun because I love how this medium brushes on to the canvas creating a creepy streak (even though I was painting the entire thing black). 

After the black paint dried we covered our hands in white paint.  Make sure you have LOTS of paint on your hand and press gently on to he canvas with your fingers slightly together.  You may want to hold your other hand on the back side to press against to avoid stretching or damaging the canvas.

Once the ghostly hand prints dry you can paint eyes and a mouth.  I used a sharpie to create my general shape and then went over that with the black paint because I am not that great when it comes to free-hand. 

I have this orangey-brown glitter glue that I picked  up for a Halloween Baby Shower that I used to write "Oct 2011" on the bottom right corner of the canvas.  In hind sight I wish I had written our names and the year, but too bad so sad.  You can do it instead. 

Our three little ghosts now hang proudly in our entry way.  To hang them I just used those little Velcro adhesive things that you can pull off with out damaging your wall.

Wednesday, September 7, 2011

Pre-School, Here We Come!

Jacob started preschool this week and his birthday is next week.  It is hard to believe that little 7lb 10oz baby boy is so grown up! Good thing we have another one on the way to appease my need to snuggle all the time! Despite my disbelief that my son is old enough to attend preschool, I was very excited for him.  I wanted to make his first first day of school picture one to remember.  I spent many hours contemplating and day dreaming about what his pictures would look like, but it wasn't until the eleventh hour that I decided to put any plan into action.  That is where Walmart and Jacob's art supply come into play...

My inspiration for this project came from http://www.iheartnaptime.net/, courtesy of http://sugartotdesigns.blogspot.com/.  Check both websites out - they are great! Here is what the free printable looked like:
Thank you Telisa for your great design!

It was too late to have a sign printed, so I began to think of Plan B.  I found a two pack of canvases at Wally World and raided Jacob's paint supplies.  You know the ones I rarely let him use because I am too afraid he'll mix all the colors together and ruin all the fun for me future paintings. A two pack was perfect because Jacob's best buddy was coming over before school to take pictures together.  If they turned out good I was excited to make one for ourselves and give the other one to Caden. 

Here is is... Jacob's first day of school ever pictures:


*If you would like to take advantage of the free printables you can find grades P - 12 here: http://www.iheartnaptime.net/2011/08/updated-back-to-school-printables-k-12.html

They say imitation is the best form of flattery. I think I did a pretty decent job!  Leave a comment and let me know what you think of my last minute project?

Wednesday, August 31, 2011

The Lemon Cucumber - A Myth?

I have heard fables from my husband about these amazingly delicious cucumbers, "lemon cucumbers" to be exact and how they would buy them at road side vendors in Northern California when he was just a boy.  In all my 30+ years I have never once seen or heard of this mythical cucumber.  In fact, until recently I was unaware that there were varieties of cucumbers such as an English cucumber.  I know, I know, you are probably wondering what rock I grew up under?! 

I will have you know that I did not grow up under a rock - I collected them. 

Since hearing my husband talk about how delicious these lemon cucumbers were I have been on the look out.  Since moving to California I have had the pleasure of enjoying some of the sweetest fruits and vegetables all locally grown.  My world has opened up!  Alix at Cali Cooking Couple (http://calicookingcouple.blogspot.com/) recently let me in on a well known local secret... Larry's Produce.  Larry's is an amazing farmer's market with great selection and awesome pricing.  (Creative Juice also has a great blog post about Larry's, check it out: http://getcreativejuice.blogspot.com/search/label/yummy)

So today Jacob and I were at Larry's picking produce for my bulk cooking project.  When what did I see before my very eyes?!  A sign that read: Lemon Cucumbers .89/lb.  I am not kidding, I stopped dead in my tracks and did a double take.  They do exist!  Where is my camera when I need it?  So of course I snagged a bag full with not a clue what to do with them.  All I knew was that I was going to have one happy husband when he gets home tonight! And as it turns out, he's not a liar after all, LOL.  As if I ever really doubted him.

Lemon Cucumbers - Not a Myth!


According to Cook's Thesaurus, a lemon cucumber is sweet and flavorful, but less acidic.  What I gather from my quickie Google education is that lemon cucumbers are used just as any other variety.  Not often are they cooked, but are used in salads, agua fesca, and smoothies.  I was hoping to find a recipe that was more interesting than slicing and dipping in dressing.  With lack of inspiration and patience to search online, I decided to improvise.  Cucumber-Apple smoothie anyone?  While it certainly wasn't "bad", it is not something I am going to try again - ever. Stick to salads and veggie trays...


So the next time you are at the farmers market or pass a veggie stand, give it a second look.  If you see a lemon cucumber, live a little - get yourself one!

Monday, August 29, 2011

"M" is for Mandy


For a long time I have known that if our second child was a girl her room was going to be "Shabby Chic".  Around the same time my husband and I agreed that if #2 was a girl her name was going to be Mandy Mae; a tribute to both our mothers.  Mandy was the name my mom wanted if my older brother had been a girl.  Mae is my husband's mother's middle name. 

I spent the past week on vacation daydreaming of our little girl's room.  The first piece that I am making for her room is a framed "M".  My inspiration was from a frame I picked up for $2 at the thrift store and had intended it use to for a baby shower for my sister-in-law.  We have since changed her theme and will not use this. Waste not!

Using all supplies I have laying around the house I began my impromptu art project.  The frame is about 12x12 - the perfect size for left over scrapbook paper.  I narrowed down my paper option to four and then I raided my material bin.  I found a pale green fabric that was perfect with one of the papers I had selected. 

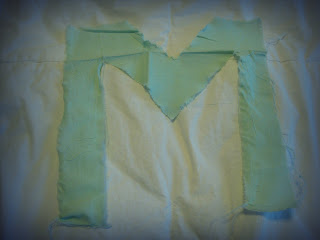
By eye balling the size of the frame I tore out the shape of an "M".  Tearing the fabric gives it a nice shabby frayed edge.  To do this start by snipping the fabric where you want to tear it.  This only works for vertical and horizontal cuts, so for the angles I made a full cut and then frayed the fabric's edge by hand. 


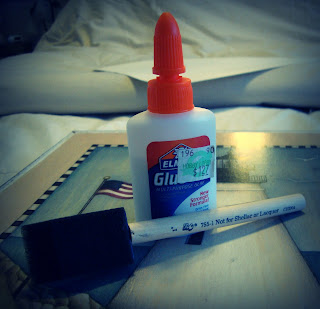
Next I used all purpose craft glue and applied it to the frame smoothing it out with a sponge brush.  Be careful to only have a thin layer of glue; too much glue will result in a wrinkled canvas when you lay your paper. After laying the paper I used the same technique to apply the fabric "M". 


That's it!  It was that simple using only items I had laying around the house from previous projects.  This project was competed for less than $5.

Five things I always have on hand:
  1. All purpose glue
  2. Sponge Brushes
  3. A good paper cutter
  4. Scrapbook paper
  5. Scraps - never throw (fabric, ribbon, paper, etc.) scraps away!